Author:
Eugene Taylor
Date Of Creation:
8 August 2021
Update Date:
7 May 2024
Content
- To step
- Method 1 of 4: Establish your turtle's habitat
- Method 2 of 4: Add plants to the habitat
- Method 3 of 4: Feeding your baby turtle
- Method 4 of 4: Keep the aquarium clean
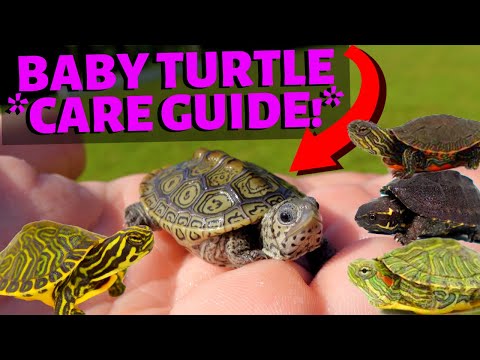
Aquatic turtles spend their time swimming and eating in the water or lounging on land. They can be wonderful, entertaining pets. However, they do need proper care, especially as a baby, if you want them to do well. To keep your baby turtle healthy, you must provide it with the right habitat, feed it the right food, and keep its tank clean to prevent disease.
To step
Method 1 of 4: Establish your turtle's habitat
 Get a large aquarium. Get a rectangular or square glass aquarium that is the right size for a full-grown turtle. That means: enough space to swim and space for stone or piece of land, so that your turtle can get out of the water completely. The bigger the tank, the better. In any case, make sure that you meet the minimum size requirements:
 - 115 liters minimum for turtles between 10 and 15 cm long.
- Minimum 200 liters for turtles between 15 and 20 cm long.
- 300-475 liters for adults taller than 20 cm
- Minimum length: 3-4 times the length of the turtle
- Minimum width: 2 times the length of the turtle
- Minimum height: 1.5-2 times the length of the turtle, and 15 to 25 times higher than the highest point in the aquarium.
 Place a heater in the aquarium. Turtles cannot regulate their own body temperature, so you will have to keep the water at the right temperature. You do this by installing a water heater. Most baby turtles require a temperature of 25-30 degrees Celsius, but always check that this is correct for the specific species you have.
 - Make sure that the heater cover is made of plastic or metal. It must not be made of glass, as that can break a turtle.
- Consider using two heaters to heat the water more evenly and always have an extra in case one breaks.
- Check the water temperature regularly with a thermometer.
- Make sure the heater is powerful enough:
- 75 watts for 75 liter aquarium
- 150 watts for 150 liter aquarium
- 250 watts for 250 liter aquarium
- 300 watts for 300 liter aquarium
 Install a UVB lamp and a heat lamp. Turtles need the UVB lamp to make vitamin D. The heat lamp is necessary for heat, as they are cold-blooded and therefore cannot regulate their own body temperature. So you have to install lamps for artificial UVB radiation and heat.
 - UVB lamps - are compact and tubular. Uses the 2.5 or 5% lamp - which is the tropical UVB or swamp UVB lamp. Desert lamps are too powerful. Place the lamp 30 cm from the water, for a 2.5% lamp. A 5% lamp should be placed 45 cm from the water.
- Heat Lamp - These are normal incandescent or halogen lamps. The type of lamp does not matter as long as it is placed at the correct distance from the sunbathing area. For baby turtles, the center of this area should be about 35 degrees and the edges should be cooler. Use a thermometer to make sure the temperature is correct.
- Timer - The lights should be off for 12 hours a day to mimic the natural cycle of day and night. Consider purchasing a timer to accomplish this.
- WARNING: Never look directly into the lamps as this can damage your eyes. Place them in a corner so that the lamp is not directly visible to people in the room.
 Place a metal screen over the aquarium. The screen helps to protect your turtle from things that might fall into the tank. It is very important, as UVB lamps sometimes explode, especially when in contact with water. The glass of the lamp can injure your turtle. Make sure the screen is made of metal, as UVB cannot penetrate plastic or glass.
  Provide a patch of land large enough for your turtle to get out of the water completely. This can be a large rock, piece of wood or floating turtle dock. Make sure there is enough slope for the turtle to climb on. Also make sure it's big enough:
 - The land area should take up about 25% of the surface of the aquarium.
- The area should be 1.5 times the length of the turtle and strong enough to support the weight of the turtle.
- The edge of the tank should be six to ten inches higher than the highest land point to prevent your turtle from escaping.
 Keep the water at the correct depth. For baby turtles, the water in the tank should be at least an inch deeper than the width of your turtle's shell. This allows him to swim around freely. As your turtle grows, you can make the water deeper.
  Use a filter to reduce the need to change the water. Turtles produce more dirt than fish; they urinate a lot. Without a water filter, you have to change the water daily to prevent diseases. With a filter, you should change part of the water every 2 to 5 days and change the water completely every 10 to 14 days. There are special filters for turtle aquariums, but you can also use a fish aquarium filter as long as it has a capacity that is 3 or 4 times the volume of your aquarium. Otherwise, the filter will not be strong enough for the amount of excrement the turtle produces. There are different types of filter:
 - An internal aquarium filter - These filters are usually attached to the inside of the aquarium with suction cups. They are too small to be the primary filter for an aquarium over 75 liters. You can use them in larger aquariums as an aid to improve water circulation.
- An External Filter - This is the best filter for your turtle tank. They are usually mounted under the aquarium and provide very good filtering, often with a UV sterilizer to kill bacteria and algae. Again, take a filter designed for aquariums 3 to 4 times larger than yours. See here for a review of the most commonly used filters.
- Hang-on-back (HOB) filters - These filters are designed to be installed close to the water of a fish aquarium. Because the water in a turtle aquarium is lower, you will have to make a filter opening - so a cut-out in the wall of the aquarium - if you want to use this type of filter. Again: take one for 3 to 4 times the size of your aquarium.
- Under Gravel Filters (UGFs) - aka an Under Gravel Filter is a reverse flow filter. They pump water up through the gravel at the bottom of the aquarium, helping bacteria in the gravel to filter the water. For maximum effectiveness, these filters should be used with 2.5 cm round gravel substrate. Unfortunately, this filter does not work for large food chunks, so you will have to scoop them out of the aquarium regularly. In addition, cleaning these filters is more difficult, as they are located under the substrate.
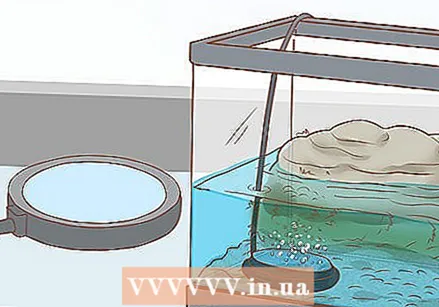 Aerate the water with an air pump or air stone. Aerating your water sufficiently prevents the growth of anaerobic bacteria, which pollute the water and are dangerous to the health of your little turtle.
Method 2 of 4: Add plants to the habitat
 Consider using artificial plants. While plants do sometimes provide benefits such as removing nitrates from the water, they are primarily decorative. With artificial plants, you don't have to worry about whether your turtle might eat them or die.
  If you are adding live plants, use substrate as well. The substrate is the sand, gravel or soil at the bottom of the aquarium. It is not necessary and will make cleaning the aquarium more difficult. A simple painted bottom is sufficient. However, if you want to add live plants with roots or create a more natural environment, consider the following substrates:
 - Fine sand - use very fine sand, such as that used in a children's sandpit. Turtles like to burrow in them. However, many owners find it difficult to clean.
- Aquarium gravel - A poor substrate for plants, its usefulness is mainly decorative. Make sure to use gravel that is large enough that your turtle cannot eat it.
- Fluorite - A porous type of clay gravel. Fluorite is the best choice if you want to place rooted plants in the aquarium. The water will become a bit cloudy at first, but it will be filtered out after a few days.
 Add plates to the aquarium. Plants are not necessary, but some people find that a more natural environment causes less stress for the baby turtle. Aquatic plants will also help keep the tank clean by soaking up debris and absorbing some of the carbon required by algae. Just make sure you choose the right plants for your type of turtle:
 - Waterweed - Grows well in low light and stunts algae growth. Good for mud / musk turtles. Plant-eating aquatic turtles such as red-eared, hieroglyphic and ornamental turtles will destroy this plant.
- Java fern - A strong plant that lives in dim light. Has tough leaves that turtles normally won't eat.
- Java Moss - A strong moss that lives in dim light. Turtles don't usually eat it.
- Houwmos - A fine-leaved plant that grows in floating mats. Tolerates dim light and grows fast enough to survive with red-eared hieroglyphic and ornamental turtles, although they will eat them.
- Ludwigia Repens– A tough plant that turtles don't eat, but they may uproot the plants from the substrate. Requires additional light (2 watts per 3.5L). Good for small turtles, such as mud, musk and ornamental turtles.
- Anubias Species - These are tough, low-light plants that turtles will not eat.
- Cryptocoryne Species - These plants can survive in low light and are hardy, but must be planted in a substrate and do not respond well to turtle uprooting. They do best with small turtles in large habitats.
- Aponogeton ulvaceus - Tolerates low light, is durable and will not be eaten by turtles. Can grow in a simple gravel substrate.
 Create a good environment for the plants. Plants need nutrients, light and (usually) a place to take root. To give your plants the best chance of survival:
 - If you are using plants that require substrate, try a clay gravel substrate such as laterite or fluorite. These provide nutrition to plants without much hassle.
- Provide extra light or choose plants that live in dim light. Most plants require 2-3 water with 3.5 liters of water in the aquarium, but most aquarium lights only provide 1 watt of light. You can add more artificial light, but don't place the aquarium near a window. That will lead to overheating and algae growth.
- If your plants are doing poorly, consider adding water plant fertilizer. This is for sale in the pet store.
Method 3 of 4: Feeding your baby turtle
 Feed your baby turtle daily. Baby turtles need a lot of nutrition to grow. Give them as much food as they want and remove any leftover food from the tank. They take a long time to eat, so give them 30 minutes to several hours.
  Put their food in the water. Aquatic turtles must be in water to swallow.
  Consider feeding your baby turtle in a separate container of water. This will help keep their tank clean of any leftover food. If you are feeding your turtle in its tank, you will need to scoop out any remaining food after feeding.
 - Add enough water to just cover the turtle.
- Use water from the tank so that it is the same temperature and does not stress the turtle.
- Give him 30 minutes to several hours to eat.
- Pat your turtle dry when you return it to its tank to remove any food.
 Offer your baby turtle a variety of foods. While turtle food contains all the necessary nutrients for baby turtles, a well-balanced, varied diet is the best way to keep them healthy. In addition, it can be difficult to get the baby to eat, offer him different foods until you find something he likes. Foods suitable for baby turtles include:
 - Flakes and Pellets - You can find several types made specifically for baby turtles at the pet store. They contain all the necessary vitamins and nutrients that your baby needs.
- Turtle sticks - Good for baby turtles and adult turtles.
- Live sludge worms, crickets and mealworms (very good, as baby turtles are attracted to movement)
 Expand the variety as the turtle grows. When your turtle is a few months old, you can expand its diet. Search online for the right types of food for the tortoise species you have. In addition to the turtle food, the following are also suitable:
 - Waxworms and small cockroaches
- Small fish or shrimp
- Boiled eggs with the shell
- Fruit (halved grapes, apple, melon, strawberries)
- Vegetables | (kale, spinach, lettuce, but no iceberg lettuce or cabbage)
 Be aware that newly hatched baby turtles may not eat for a week or two. They then live on the nutrients in their eggs. Offer them food, but don't be alarmed if they don't eat.
  Make sure the water in the tank is warm enough if your turtle is not eating after a few weeks. Turtles do not eat or digest when they are too cold. Use a heater to bring the water temperature to the right temperature for your turtle.
 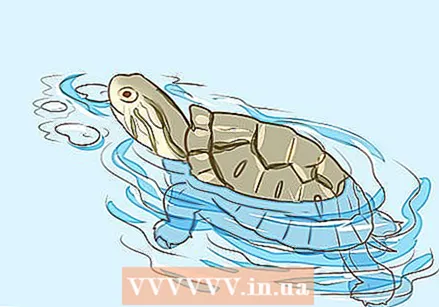 Leave your turtle alone while eating. Many turtles do not eat when viewed. If your turtle is not eating, leave it alone with its food.
Method 4 of 4: Keep the aquarium clean
 Clean some regularly. This gives your baby turtle a healthier living environment and ensures that you do not have to do a big cleaning as often.
 - Aquatic turtles need to eat in the water as they do not produce saliva. Unfortunately, leftover food decays very quickly and that makes for a dirty aquarium. Use a net to scoop any leftover food out of the water when your turtle has finished eating.
- Use a siphon hose to clean the substrate (the stones or gravel on the bottom). Do this every 4 or 5 days. Use a pipette to start the misting and place the end of the hose in a bucket below the level of the aquarium. Gravity will then release the water from the aquarium into the bucket.
- For more efficiency, you can also use the siphon hose as a partial water change. Make sure you siphon enough water and replace that amount (see below).
 Clean or replace the filter medium regularly. The medium in your filter is what filters the dirt, leftover food and excrement. If it is a sponge, you should clean it weekly by rinsing it with water. Do not use soap. You can also clean foam filters or, if you use filter floss, polyfill, or carbon, replace it weekly. Filters are full of bacteria, so make sure to:
 - Disconnect the filter before you start working on it.
- Works away from food and away from where food is being prepared.
- Wear gloves or avoid cleaning if you have cuts or scrapes on your hands.
- Wash your hands with soap and water after cleaning the filter.
- Remove and wash clothes that have gotten filter water on them.
 Change the water regularly. Even if you have a filter, you should change the water regularly to prevent small particles and nitrates from building up. You can change the water as often as you like if you feel the water is dirty. Here are some guidelines:
 - Small aquariums (115 liters or less) - Change 20% of the water every 2 days. Change all water every 10-12 days.
- Medium to Large Aquariums (115 liters or more) - Change 50% of the water every 5 days. Change all water every 12-14 days.
- With high quality, external filters with high capacity - Change 50% of the water every 7 days. Change all water every 17-19 days.
 Test the water to make sure you change it often enough. Especially in the beginning it is good to pay a lot of attention to the water to make sure it is clean.
 - A strong odor or change in the color of the water means that a complete change and cleaning of the aquarium is required.
- The water pH, which indicates the acidity / alkalinity, should be between 5.5 and 7. Buy a pH test kit from your pet store and test the water every 4 days for the first month to make sure you are maintaining the correct pH level.
 Clean and disinfect the tank when you change all the water. You can do this once every 45 days or so, as long as you add turtle-safe solvents that help disinfect the water (available at most pet stores). If not, you will need to disinfect the tank more often to keep your turtle healthy. If you have live plants with roots in the substrate, keep a closer eye on the water quality to make sure your turtle stays healthy.
  Collect the correct cleaning and disinfection supplies. It is useful to collect all the supplies in advance. Continue cleaning in a place away from places where food has been or is being prepared. Make sure to use disinfectant that is safe for turtles or make your own with bleach. In that case, use 100 ml bleach in 3.5 liters of water. Other supplies are:
 - Sponges
- Scrapers (such as a silicone knife)
- Basins for soapy water and for rinsing water
- Paper towel
- Garbage bags
- A spray bottle or basin for the disinfection solution and a basin with flushing water
- A large container to soak artificial plants, rocks and your turtle's land area
 Clean the aquarium thoroughly. First, take your turtle out and put it in a separate container. A bucket with enough water from the tank to cover it is fine. Then clean the aquarium, land area, substrate, and other surfaces (e.g., the heater). Use a tub or sink, but not your kitchen sink, to avoid contamination.
 - Unplug all electrical appliances: the heater, filter, lamps, etc.
- Clean the surfaces of the electrical equipment that are under water with soapy water and a disinfectant spray. Rinse thoroughly.
- Remove the land area. Clean it with soap and water and soak in disinfectant for 10 minutes. Then rinse thoroughly.
- Remove the substrate. Clean it with soapy water and soak in disinfectant for 10 minutes. Then rinse thoroughly.
- Clean the aquarium with soapy water and a sponge. Fill with disinfectant (1 part bleach to 9 parts water) and soak for 10 minutes. Empty the tank and then rinse thoroughly.
- Put everything back in the tank. Make sure the water is the right temperature before putting the turtle back.
- Wear gloves or wash your hands thoroughly after cleaning to avoid contracting illnesses, such as salmonella.


