Author:
Frank Hunt
Date Of Creation:
19 March 2021
Update Date:
12 May 2024
![[11GB=500KB] How to Ultra Highly Compress any files easily only 2 settings | Ultra Compress Files](https://i.ytimg.com/vi/gsCpjuo2hzE/hqdefault.jpg)
Content
- To step
- Before you start
- Method 1 of 4: Using compression software for large files and folders
- Method 2 of 4: Compressing large video files
- Method 3 of 4: Compressing large images
- Method 4 of 4: Compressing large sound files
Compressing files in modern operating systems is easy, but things can get a bit more complex with large files. If the files are too large, you will not be able to use the built-in compression software of your operating system. Fortunately, there are programs out there that can compress files of any size and with the right settings (in theory) are able to reduce the size of a file considerably. If you are trying to store your media files with limited disk space, there are several image, video and sound formats that allow you to compress those files without too much quality loss.
To step
Before you start
 Understand that not all files can be made much smaller. Compression works by replacing a string of characters within a file with the same smaller string of characters, resulting in a smaller file size. Not all files lend themselves well to compression and it may not be possible to make a file much smaller than its original size.
  This article is about compressing files that are too large for the standard compression software and compressing media files. If you want to learn how to merge multiple files into a single compressed archive file using your operating system software, click here.
Method 1 of 4: Using compression software for large files and folders
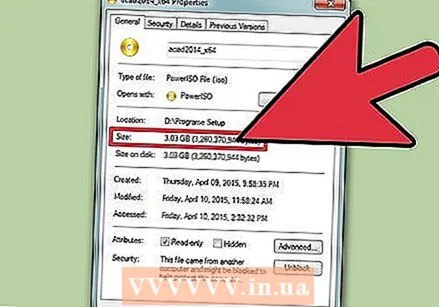
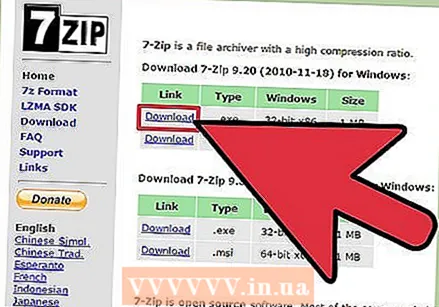 Download an alternative compression program for files larger than 4 GB. The built-in compression software on most operating systems does not go beyond 4 GB of data in a single ZIP file. If you need to compress a larger file, you will need to install other software.
 - Remember that when sharing packed files, the recipient will need a program to open the type of file you have created.
- 7-Zip is one of the most popular open source programs for Windows. You can download it for free from 7-zip.org/download.html.
- WinRAR is a powerful commercial program for Windows and the Mac for very efficient compression.
- Archiver is one of the most popular Mac compressors, which allows you to create archive files in both 7-Zip and RAR format, in addition to its proprietary format.
 Adjust your compression settings. With the default settings, 7-Zip and WinRAR usually compress more efficiently than with the compression software built into the operating system. You can increase the compression even further by adjusting a number of settings.
 - 7-Zip - Right click on the file or folder you want to compress and select "7-Zip" → "Add to archive". In the "Add to archive" menu, you can set the compression options. Note that increasing the compression levels can significantly increase the time it takes to compress. For maximum compression, set "Compression Level" to "Ultra". Set the "Library Size" to a value that is ten times smaller than the available memory in your PC. A large library means better compression, but the memory requirements are ten times that of the library size. Set "Solid Block size" to "Solid" for the best compression.
- WinRAR - Right click on the file or folder you want to compress and select "Add to archive" with the WinRAR logo. Note that increasing the compression levels can significantly increase the time it takes to compress. In the General tab, select "Best" from the "Compression method" drop-down menu. Make sure "Library Size" is set to "5096 KB". Check "Create solid archive". Click the Advanced tab and then the Compression button. Set "Text Compression" to "Automatic".
- Archiver - Archiver doesn't have as many options as its Windows counterpart, but you can set the compression level when creating an archive. Note that increasing the compression levels can significantly increase the time it takes to compress.
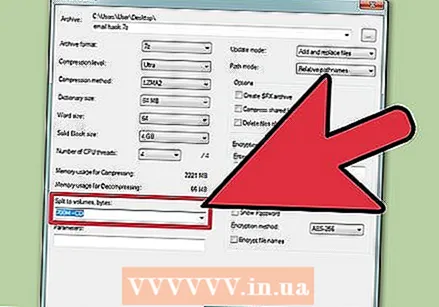 Split a large compressed file into several smaller files. One of the advantages of other compressors is the ability to create multi-part archives. For example, you can take a 12 GB folder and divide it into three smaller files, each of which will fit on a DVD. You need all the parts to extract the original files, so don't lose any of the files.
 - 7-Zip - From the "Add to archive" menu, you can use the "Split to volume" drop-down menu to select from a number of different preset sizes. You can also enter a preferred size. Each part will be the size assigned by you, with the last part being the size of what's left.
- WinRAR - In the General tab of the "Archive name and parameters" menu, use "Split to volumes, size" to select the size of each sub-file. You can also specify custom sizes and use the following drop-down menu to specify the unit (byte, kilobyte, megabyte, etc.). Each part will be the size you specified, with the last part getting the size of what's left.
- Archiver - Click the "Split" button in the Archiver menu after adding the file. Set the size of each part file. Then you can set the compression for the file.
Method 2 of 4: Compressing large video files
 Download Avidemux. This is a free, open-source video editor that allows you to easily compress and convert video files. You can download it from fixounet.free.fr/avidemux/. It is available for Windows, Mac and Linux.
 - Videos are large chunks of data that cannot be easily compressed when added to an archive using the above method. It is better to re-encode the file with Avidemux, which significantly reduces the size of the file at the expense of some of the quality.
- Movie files downloaded from an online source are likely already compressed. If you compress this even further, the end result will practically no longer be viewable, or will not really contribute to a significantly smaller file.
- It is not possible to unzip a compressed video. You should always keep the uncompressed version as a separate file so you don't lose the original.
 Start Avidemux and open the video file. Click "File" → "Open" to find the file on your computer. It may take a few minutes for the video to load.
 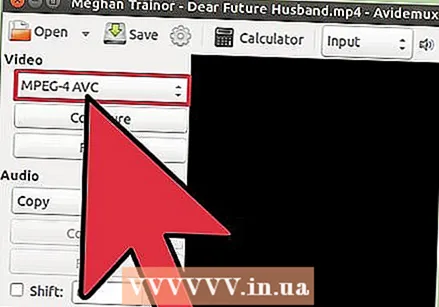 Set the drop-down menu "Video Output" to "Mpeg4 AVC (x264)". This is the format that is compatible with your converted video.
  Set the drop-down menu "Audio Output" to "AAC (Faac)". Compresses the audio track of the video to reduce its size.
  Set the "Output Format" to "MP4 Mixer". This ensures that the video can be played on as many devices as possible.
  Press the button .Configure in the "Video Output" section.
 Locate the "Ratio Settings" section of the tab.General .
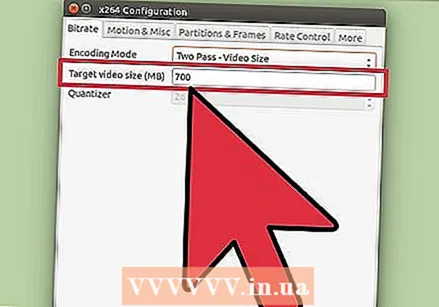 Select "Video Format" from the drop-down menu. Enter the target size for the converted video. Avidemux will adjust the settings to get as close to the target size as possible, but it may be slightly up or down.
 - Note that setting a size significantly smaller than the original will dramatically decrease the quality of the target file.
 Click the "Save Video" button. You will be asked to enter a name for the video, after which the compression can begin. Depending on the length of the video and the quality settings, this may take some time to finalize.
Method 3 of 4: Compressing large images
 Understand what kind of files can be compressed. Most of the images you download online are already compressed. The file formats .webp, .gif, and .png are all forms of compression and further compression will sharply degrade their quality. The compression for images is very useful if you are working with images directly from the digital camera or .bmp files.
 - It is not possible to decompress a compressed image. Always keep the original version as a separate file so you don't lose the original.
 Understand the difference between "lossless" (exactly reversible) and "lossy" (not exactly reversible) compression. There are essentially two different types of compression when it comes to images: "lossless" and "lossy". Lossless compression is used where you need an exact replica of the original, and is mostly used for illustrations, diagrams and medical images. Lossy compression is intended for cases where loss of quality is not immediately noticed, and is widely used for photographs.
 - .gif, .tiff and .png are all lossless formats.
- .webp is the most common lossy format.
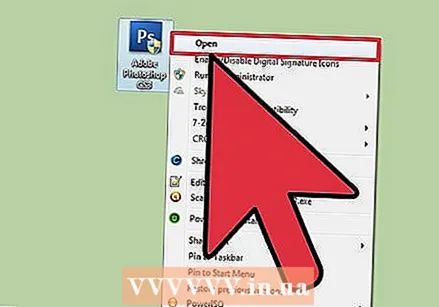 Open the file in your preferred editor. Almost all image editors support compression by allowing you to save your image in a different file format. When you choose a certain form of compression, you get a number of options with regard to the degree of compression that you can apply.
 - Photoshop, GIMP and even Paint allow you to store image files in compressed form. Almost all image editing software will work, although some programs offer more choice for quality control than others.
 Click on "File" → "Export As". This allows you to save a copy of the original file in a new format.
 - If you are using Paint or some other simple image editor, you will need to use "Save As" for this.
 Select your preferred format from the "Type" menu. The format you choose largely depends on the type of image.
 - If you want to compress a photo, select .webp as the file type.
- If you want to compress an image of less than 256 colors, select .gif as your file type.
- If you want to compress a screenshot, drawing, comic or other unnatural image, select .png.
- If you want to compress an image that has layers in it and you want to keep the layers, select the .tiff format (note that .tiff is not considered a form of compression).
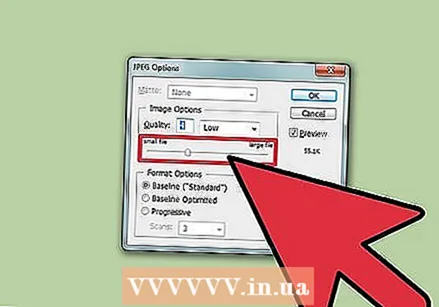 Set the quality options (if possible). Image editing software such as Photoshop and GIMP will ask you to indicate the quality and degree of compression after you press Export. You usually adjust the quality and compression with a slider.
 - Increasing the compression (reducing the quality) will result in a smaller file size, but it will cause errors in the final result and the color of the image may change. You will have to play around with the settings yourself to find a good balance between quality and size.
Method 4 of 4: Compressing large sound files
 Understand what can and cannot be compressed. Most sound files that you download from the Internet, such as .mp3 or .aac files, are already compressed. Further compression will most likely only result in poorer sound quality. Compression is best for uncompressed file types such as .wav or .aiff.
  Download Audacity. This is a free open source audio editing program and available for Windows, Mac and Linux. You can download it from audacity.sourceforge.net/.
 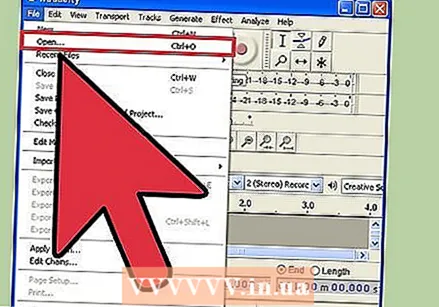 Open the file you want to compress. You may be asked if you want to copy the file to your Audacity project; this helps to avoid accidentally overwriting the original.
  If necessary, make the file mono. This is not recommended for music or anything else where stereo effects are essential, but for narration or other recordings where hi-fi is not required, switching to mono (single track) can make the file significantly smaller.
 - Click the ▼ next to the file name in the project area. Select "Split to Mono" from the menu.
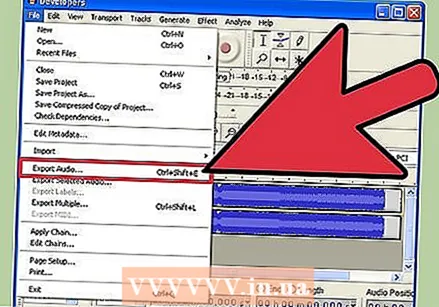 Click on "File" → "Export Audio". This will open a window that allows you to set where the file will be saved and in what format.
  Select the type of compression. All formats listed in the "Save as Type" menu are some form of compression, except .wav and .aiff. The format you choose depends on the requirements.
 - .mp3 is the most common format for music, because it allows good compression without too noticeable loss of quality. It is also suitable for almost any device.
- .Flac is a lossless compression. This is suitable if you want to play the audio through a high-quality sound system, but it is not compatible with many devices. .flac will also not cause a drastic reduction in file size.
 Press the button .Opsties ... to set the compression. After choosing the format, click the Options ... button. The options available depend on the selected file type.
 - For .mp3, a lower bitrate (bitrate) will result in a smaller file size, but also in a lower quality of the sound. 128 Kbps is about the equivalent of FM radio sound quality, while 320 Kbps is about the equivalent of a CD.
 Export the file. If you have converted the file to mono, you will be asked if you want to continue. Audacity will convert and compress the sound file, and the new file will be saved in the specified location.
 - If you create an .mp3 file but don't have the Lame codec, you will be prompted to download it. Follow the download instructions on the page and install the Lame codec. You may have to restart the Export.


