Author:
Eric Farmer
Date Of Creation:
12 March 2021
Update Date:
13 May 2024
Content
- Steps
- Method 1 of 4: Enhancing the brightness of the eyes with shadows
- Method 2 of 4: Temporarily change eye color with contact lenses
- Method 3 of 4: Change Eye Color with Photoshop
- Method 4 of 4: Surgically Changing Eye Color
- Tips
- Warnings
Eye color is a unique characteristic of a person, and it is difficult to change it without the help of lenses. You can correct an existing color using special types of shadows. You can also change your eye color for the day with colored contact lenses. There is also the possibility of a surgical change, however, at the time of this writing, this operation is still being tested. This article will show you how to change your eye color. It also provides advice on colored lenses and surgery.
Steps
Method 1 of 4: Enhancing the brightness of the eyes with shadows
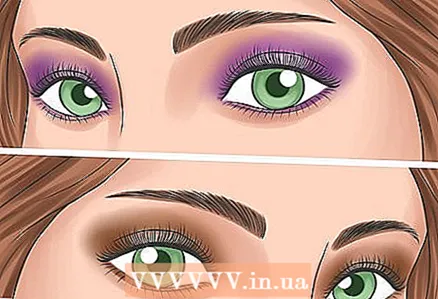
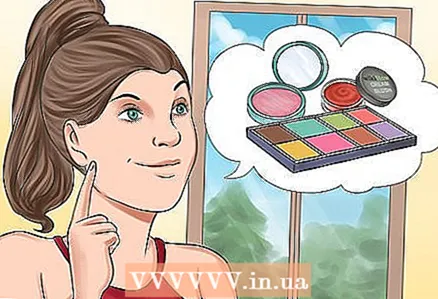 1 Understand how cosmetics can change eye color. You can't turn blue eyes into hazel and vice versa with makeup, but shadows will help you enhance the color you have. You can make your eyes brighter, dimmer, paler - it all depends on the shadows you choose. Some shades of eyes (for example, brown and gray) can take on new tones thanks to the shadows. In this part of the article, we will talk about how to correct eye color using makeup.
 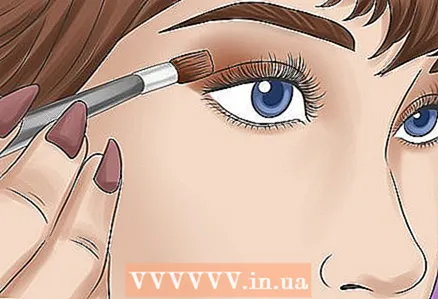 2 To brighten blue eyes, use shadows in warm tones. Orange shades (coral, champagne) work best for this. Your eyes will appear much brighter and richer than they are. If you apply blue eyeshadow, the eyes will appear lighter and paler. Try the following combinations:
 - In everyday makeup, you can use neutral tones: brown, taupe, terracotta and any shades of orange.
- For evening makeup, you can try metallic colors, including gold, copper and bronze.
- Avoid overly dark tones, especially if you have pale skin. It's best to use a brown or dark brown eyeliner rather than black because brown will look less harsh.
 3 To make brown eyes appear brighter, use cool colors. Almost all colors suit people with brown eyes, but cool shades, especially burgundy and blue, will help brighten the eyes. Here are some possible options:
 - For daytime makeup, it is best to buy brown shades. To make your eyes stand out, try silvery browns and orangey browns.
- If you are ready to take the risk, paint your eyes with blue, gray, green or burgundy eyeshadow.
- In evening make-up, use metallic colors: bronze, copper, gold. Gold with a greenish tint will also work.
- If you have dark brown or black eyes, diamond shades - light blue or purple - will suit you. Don't be afraid of silver and chocolate color too.
 4 Accentuate the green or blueness of gray eyes with blue or green eyeshadow. Gray eyes take on the color that is next to them, so with shadows you can give your eyes a bluish or greenish tone. If you want to emphasize gray tones, choose soot colors: gray, charcoal, black. Here are some guidelines for how to accentuate blues or greens in your eyes:
 - To brighten the blue shades, apply shades of the following shades: copper, melon, neutral brown, orange, peach, salmon. To make the eyes more expressive, apply some blue to the inner corner of the eye.
- To accentuate green, use shades of the following colors: maroon, pink, plum, burgundy, red-brown, wine.
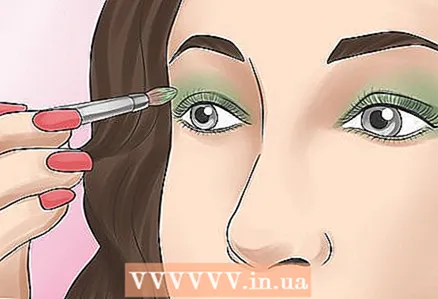
 5 If you want to make the green eyes more intense, use burgundy or brown shades. These colors work best with green eyes. They contrast with the green pigment in the eyes, making the eyes appear brighter and more vibrant. For example, you can use burgundy shades for the exit, and sparkling browns or brown-gray shades for the day. Try the following colors:
 - All shades of burgundy will look good on you. If you don't like this color, go for pink eyeshadow.
- If you are not sure if you should dye your eyes burgundy, try applying a gray-brown eye shadow to the eyelid and draw a burgundy line closer to the lash line.
- Black eyeliners look too harsh with green eyes. Better to use a charcoal, gray or maroon eyeliner.
 6 If you have brown eyes, accentuate the greens and golds in them. Brown eyes have reflections of green and gold, which means you can accentuate them with matching shadows. Here are some possible options:
 - Don't use dark colors. They will hide the greenish and gold hues, making brown eyes appear cloudy.
- To liven up greenish and golden undertones, use bronzes, dusty pinks, or mauve shades. The shades of the marsh color set off the green especially well.
- If you want your eyes to appear more brown, paint them with golden or green eyeshadow.
Method 2 of 4: Temporarily change eye color with contact lenses
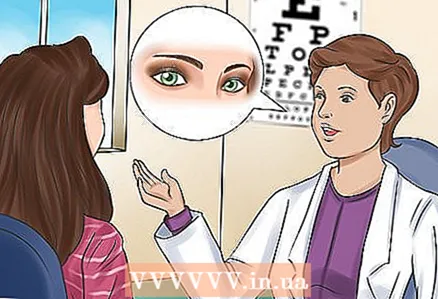 1 See your doctor for a prescription. Even if you have excellent vision, you need to have your doctor match the lenses to your eyes. Eyes come in all shapes and sizes, and if you buy the wrong lenses, it will hurt to wear them. Sometimes the eyes just won't accept the lenses. It is not uncommon for doctors to prescribe special lenses, especially if a person has dry eyes.
  2 Buy lenses from a trusted location. The miser pays twice, and in the case of lenses, this is also true. It is better to spend money on more expensive ones than to buy cheap ones and then regret it. The eyes are a very sensitive organ, and a poor-quality product can cause significant harm to them.
 - It is best to buy lenses from an optician or medical center.
- Corrective colored lenses are available for people with poor eyesight.
 3 Decide how often you will wear your lenses. Some lenses can be worn only once, others several times. Since colored lenses are more expensive than regular lenses, it is important to consider how long you will be wearing them. There are several types of lenses:
 - Disposable. They can be expensive and can only be worn once. If you want to wear lenses for one or two events, these are the right fit for you.
- Lenses for day wear that need to be removed at night. How often you need to replace them depends on the brand. Some last for a week, others for a month or even longer.
- Long-term wear lenses. You can even sleep with them, but this is not recommended. The longer the lenses are in the eyes, the higher the risk of infection. As with daytime lenses, the length of time this type of lens is worn depends on the manufacturer. Some can only be worn for a week, others much longer.
 4 Buy lenses with a light tint if you have light eyes and only want to tweak the tone slightly. They are also great if you want to enhance your natural color (even if you have dark eyes). Since these lenses are transparent, they are not recommended for people with dark eyes - the new color will simply not be visible.
  5 Buy opaque lenses if you want a completely different color or if you have dark eyes. These lenses do not show through, so they can completely change your eye color. They come in natural colors (brown, blue, gray, green, hazel), but there are also unnatural colors (white, red, cat's eye, burgundy).
 - In some optics it is also possible to order an individual color and shade.
 6 Be aware of potential aesthetic concerns. You will have to insert the lenses into your eyes, which means they can move when you blink. If the lens moves to the side, your natural color will be visible. People around you will immediately know that you are wearing lenses.
 - This will be most noticeable with opaque lenses.
 7 Be aware of possible vision problems. The pupil and iris change in size as the intensity and direction of light changes. Contact lenses cannot do this. If you enter a dark room and your pupils dilate, you will lose some of your vision as the pupil is partially obscured by the colored part of the lens. If you go out into the sun, your pupils will narrow and your natural eye color will be visible around the edge of your pupil.
  8 Keep your lenses clean. If you don't clean your lenses regularly and correctly, you can get an infection. Some eye infections are very dangerous and can lead to loss of vision. If you do not wear your lenses, always keep them in the container. Clean them with brine before placing them in the container. Change the solution in the container to a fresh one each time.
 - Always wash your hands before touching lenses.
- Never wet your lenses with saliva. There are many microbes in the human mouth.
- Do not let anyone wear your own lenses and don’t wear someone else’s, even if you disinfect them.
 9 Do not wear your lenses longer than necessary and always remove them on time. This means that the lenses must be removed at night, even those designed for extended wear. You can sleep in these lenses, but if they stay in contact with your eyes for a long time, it will increase the likelihood of developing an infection. You can also remove your lenses before showering or swimming in the pool.
 - Some lenses can be worn multiple times, while others can only be worn once. Do not wear your lenses for longer than they were designed for.
- Lens fluid has an expiration date. Never use an expired product.
- To prevent bacteria from accumulating on your lenses, replace the lens case every 3-6 months.
Method 3 of 4: Change Eye Color with Photoshop
 1 Launch the Photoshop app and open the image you want to edit. Any photo can be used, but it is best to take a clear image with a good resolution. To upload a snapshot to the program, click "File" in the top menu and then "Open" in the drop-down menu.
  2 Zoom in on the area with the eyes. You can click on the magnifying glass icon. It's in the narrow sidebar on the left side of the screen, closer to the bottom. If you cannot find it, press the "Z" key on your keyboard. There are two ways to enlarge the area with eyes:
 - Click on the eyes with the left mouse button. The image will be enlarged. Do this until now, until the part with the eyes is large and clear.
- Click on the area above the eyes on the left side. Drag the cursor to the bottom-right edge. You will have a rectangular selection. If you release the cursor, the area with the eyes will enlarge.
 3 Select the iris of the eye with the lasso tool. If you cannot find this tool, most likely you have selected other tools from the lasso group. Click and hold the selected lasso tool (usually the third icon from the bottom) and from the drop-down menu select the icon that resembles a lasso.Don't worry if the selection isn't very neat - you can tweak it later.
 - To select another eye, press and hold the Shift key. Circle the second iris like the first.
 4 Create a new layer. You can click on the "Layer" tab in the top menu and then select "New Layer" from the drop-down menu.
 - When you hover your cursor over "New Layer", a side menu appears with a list of options. Select "Hue / Saturation".
 5 Open the "Edit" window and check if you have selected the "Add color" option. This window is on the same side as other windows, including layers and color controls. Click on the window and check if the bird is next to the words "Add color". The iris will change color.
 - The pupil can also change color. Don't worry - it can be fixed later.
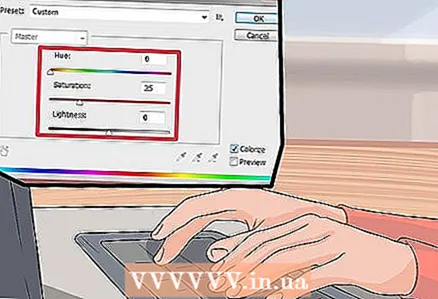 6 Move the Saturation, Hue, and Lightness sliders until you get the color you want. The hue slider will change color as you move it. As the saturation changes, the color will become brighter or fainter. Use the brightness slider to lighten or darken the color.
 - The color may appear slightly unnatural. Don't worry, this can be fixed too.
 7 Make sure you have an edit window open. Click on the window with layers. You will see two layers: background and hue / saturation. You will need to work in a window with saturation and hue, all the main changes will take place there. The background is your original image.
  8 Using the eraser tool, work around the pupil area and clean up the area around the iris. Click on the eraser tool in the side menu. Adjust the size if necessary. This can be done by clicking on the small dot and number opposite the brush tool. When you get the size you want, gently wipe the pupil area. When you're done with this, work around the pupil area. Erase any unnecessary items if necessary.
 - Now the eyes should look like real ones, only in a different color.
 9 Change the way the layers are connected, if necessary. Go back to the "Layer" window, click on the drop-down menu. The following options will appear: Normal, Diffuse, Darken, Multiply. Select Tint or Color at the bottom of the menu. The texture of the eye will become much clearer.
  10 Blend the layers if you are not happy with the result. Click on the layer called "Background" and choose "Noticeable Blending" from the drop-down menu.
  11 Save the image. This can be done in any format. By default, Photoshop saves documents in a format for working in the program, but you cannot post such an image on the Internet. Better to save the file in JPEG format - this is the standard image format for the Internet.
Method 4 of 4: Surgically Changing Eye Color
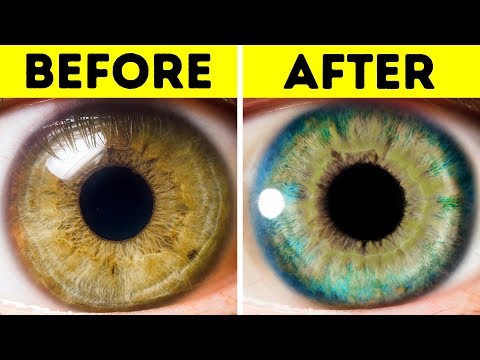
 1 Get laser surgery if you want to turn brown eyes blue. The operation will take about 20 seconds. During the operation, the outer layer of the iris will be removed and the blue color will come out. In 2-4 weeks, the body will get rid of the remaining layers, and the eye will become bluer.
  2 Be aware of the disadvantages of the operation. At the time of this writing, this operation is still undergoing testing, so the possible consequences are not yet known. In addition, it cannot be done in many countries, and where possible, the cost of the procedure is very high. The operation can only change the brown color to blue, and it will be impossible to return the brown color. As with many eye surgeries, surgery can lead to loss of vision.
  3 Change the color of the iris. This operation takes 15 minutes per eye and is done under local anesthesia. The flexible, colored iris is inserted into the eye right on top of the natural iris.
 - This operation is not irreversible. The implant can be retrieved using a similar surgical procedure.
- Recovery takes 2 weeks.During this time, vision may be blurred and the eyes may turn red.
- After the operation, you must not drive. If you are considering having surgery, remember that you will need to ask someone to drive you home.
 4 Be aware of the potential risks associated with this procedure. Such an operation, like many other eye surgeries, is dangerous in its possible consequences. As a result of the operation, vision may deteriorate, and in some cases blindness may occur. Be aware of the following possible complications:
 - The artificial iris will increase the pressure on the eye. This can lead to glaucoma and blindness.
- The surgery can cause cataracts. Cataract is a condition in which the eye starts to become cloudy.
- The operation can damage the cornea. You may need a corneal transplant.
- The natural iris and surrounding area may become inflamed. This will cause pain and blurred vision.
Tips
- Remember that it is impossible to permanently change the natural color of the eye without surgery.
- Try changing your eye color using a mobile app. You can buy any application that allows you to change the color of the eyes of people in photos, but which program is right for you depends on the type of device you have.
Warnings
- Do not wear your lenses for more than a day, or you may develop an infection, which could result in loss of vision.
- Eye surgery can lead to serious complications.
- If you notice that your eyes are significantly lighter or darker, see your doctor as soon as possible. A sudden color change, especially from hazel to blue, can be a symptom of a serious medical condition.


